Editing Memberships
Introduction
Editing memberships might be one of the more complicated parts of the system setup process. This results from the fact that there are so many memberships that are available for the events. The timeline display is a tool that has been designed specifically to give you a good feel of the timeline and distribution of your membership types.
Timeline Display
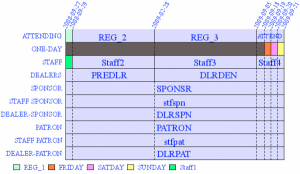
The timeline display is an image that is generated to show all the memberships for this event on a timeline.
As you can see with this image, once you have many memberships added to the system the timeline display gets larger and larger. The idea is fairly simple. Across the top you see the dates, and down the left you see membership groups. Within the table are the memberships themselves. If you were to draw a vertical line at any point on this timeline, it would show you all the memberships that are available on that date.
Building a Membership Timeline
Before we cover how to actually modify or create memberships, we'll show you what it looks like as you build your own timeline for your event.
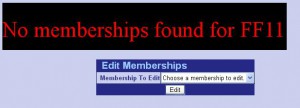
When you first start to create your event, your event won't have any memberships. As a result the timeline will look like this: (FF11 is our event id)
Once you've added your first membership, the display will look like this with your first membership taking up the whole timeline.
The next membership we have added will be in the same membership group. This means the customer is getting the same type of membership but something has changed, usually a price increase.
The next membership we'll added will be again in the same membership group. You'll notice the timeline is automatically extending.
Next we'll add a sponsor level membership. This membership level will sell at the same time as the attending level.
Now you can see that, if we draw a vertical line down the timeline, at any given time there will be one attending level membership available, and the sponsor level membership available.
Now let's add three more memberships at once. We'll add two exhibitor memberships and an exhibitor assistant membership to the timeline.
At this point you should have a fairly good understanding of the timeline, so we'll get into the mechanics of editing memberships.
Modifying Memberships
When you want to modify memberships for your event, first log into the console, click on the System Admin menu, and then the Modify Membership Types menu.
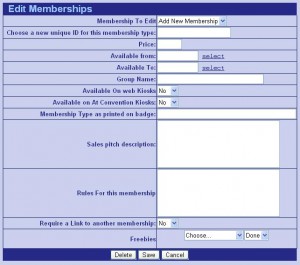
Once logged in, either choose a membership to edit, or choose "Add New Membership." This will bring you to the membership modification screen.
- Membership to edit - This will either display the membership you're editing, or "Add New Membership" if you're creating a new membership.
- Choose a new Unique ID for this membership - This will allow you to select a brief unique id for each membership type you come up with.
- Choose membership to copy settings from - If you have a membership already existing, then you may use this pull-down to copy the settings from that membership.
- Price - The price of the membership.
- Available From - The date that the membership is available from.
- Available To - The date that the membership is available to.
- Group Name - The group name that this membership belongs to. Memberships with the same group name will be kept in the same row on the timeline.
- Available on Web kiosk - This will set this membership to be available for purchase on the web kiosks. (Remember that these will only show up if the kiosk is used on a date between their Available From and Available To dates)
- Available on At Convention kiosk - This will set this membership to be available for purchase on the at-event kiosks. (Remember that these will only show up if the kiosk is used on a date between their Available From and Available To dates)
- Membership Type as printed on badge - This is the name of the membership type as printed on the badge. For example, the group name could be Attending, but the name on the badge could be Pre-Reg Attending.
- Sales Pitch Description - The sales pitch is how the customer determines what membership type he wants to select.
- Rules for this membership - This tells the customer in bold lettering what the requirements are in order to purchase this kind of membership. (But this does not make the computer enforce any such rules.)
- Require a link to another membership - If you have certain membership types that are only allowed to be purchased if they are linked to another membership, this option will enforce that link. For example, if someone wants an exhibitor assistant membership and we want to make sure they link to their exhibitor, then we click yes on this.
Once we do, a extra field will appear in our setup. In this field we can either put a * to indicate that this membership can link to any other membership type, or we can list all the membership types that this one can link to. In our example, we have decided that the exhibitor assistant must link to an exhibitor membership. The two exhibitor memberships are DLR_01 and DLR_02, so we add those to the list using a comma seperator.![]()
Now we know that anyone getting this membership type will be required to link to either a DLR_01 or a DLR_02 membership before they can continue.
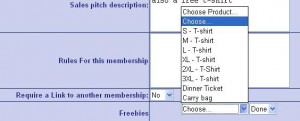
- Freebies - Freebies are items that are given out for free with a specific membership type. For example, the sponsor membership type gets to choose a t-shirt, while the patron membership type gets a dinner ticket and gets to choose a t-shirt. Please be aware that at this time you must SAVE your membership FIRST before editing the freebies selections.
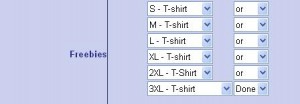
It is important to understand how the system works through these items. First, the system breaks up the list into smaller groups by using the "ANDs". Then it uses the "ORs" to allow one choice in each smaller grouping.The first step is to pull down the Choose... menu and choose the first product.
Next pull down the Done. menu and choose the first "AND" or "OR".
Once you've selected an "AND" or "OR" the menu will automatically expand to add another item.
We will go ahead and add the whole list now.
Important note: If you accidentally add too many items, you can click "Done" on an earlier item. While the rows won't automatically go away, anything past the first instance of "Done" will be dropped when the item is saved.
- Ex 1 - Large Shirt OR Small Shirt - would result in the customer being able to choose between either a large shirt or a small shirt, but not both.
- Ex 2 - Large Shirt AND Coffee - Would result in the customer getting both the large shirt and the coffee.
- Ex 3 - Large Shirt OR Medium Shirt AND Coffee OR Tea - Would result in the customer being able to choose a beverage choice, and also being able to choose which size shirt they want.

